My father-in-law, who is the best father-in-law in the history of tattooed, beer-drinking, home-improving, shit-talking, texting, dog-loving father-in-laws, gave me a miter saw for Christmas. This man knows my heart and approves of women learning trades. The family joke is that I am the son-in-law he always wanted, because fuck your gender norms.
To date, he's given me a jigsaw, a circular saw and now the miter saw. I purchased my own drill, two sets of drill bits, and a hand saw. I am stoked that my little power tool collection is growing.
But what does this have to do with ponies?
Once upon a time, I saw an image on Instagram that combusted my heart with instantaneous longing:
Then Hillary posted her gorgeous grooming box and I was again reminded of my intense and burning love for these things. As well as the thought that a divider might help with my hoards of crap.
| Hillary's. |
 |
| Vintage Stubben, because who doesn't have spare saddles in their garage? |
- I cut six pieces of wood, five from a 1x6x10 (I think it was a 10 footer - I have some left over), and the sixth from a 1" round:
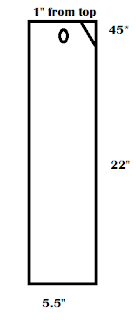
- 2 pieces at 22"
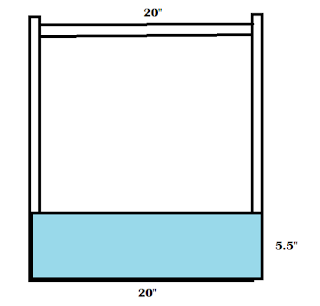
- 2 pieces at 20"
- 1 piece at 18"
- 1 piece at 5.5"
- the round at 22"
- The 22" pieces sandwich the 18" piece. If you have any holes in your wood, use that piece for the bottom, as a dirt-release. Unless the hole is bigger than your hoofpick. I got the measurement for my side-pieces from the length of the bottom board plus the width of my two tall sides. I didn't pick 22" at random, I actually tried to measure the drop on my dressage saddle.
- Before I attached my tall pieces to my base, I notched the ears (they're neutered) and drilled my 1" hole for my handle bar. Just a side note: when you purchase wood from the lumber store (generally), the "size" is deceptive. The 1x6 is actually closer to 1x5.5, so measure that shit.
- I attached one side of tall pieces to the base with two 1¼" wood screws. No idea if that length is sufficient, so fingers cross. Then I inserted (forcibly) my handle into the hole on the other piece of tall wood. I lined the handle up with the hole on the piece already attached before I drilled the second piece to the base. There was more force. Sanding the hole prior to shoving that thing in there probably would have helped. I do not feel good about this paragraph at all.
- Then I attached one side piece to both the bottom piece and either tall piece. I think I used four screws. Then I placed my itty bitty divider against the side piece and drilled it in with two screws. Here's the technical on that: the divider is going to rise above the side pieces, because that 5.5" side needs to be the width. I was okay with that. If you aren't, subtract the width of your bottom from the height of that piece. Then I screwed the remaining piece on to the tall sides, base, and divider. Six screws?
 |
| Aerial view. |
- After all the assembly, it made vague and half-assed contact with some sand paper and then I did the absolute worst stain job in the history of stain jobs. Between my ineptitude with the miter saw and with sanding/staining, I'm calling this piece my Monet. She looks good from a distance.
- Wider. Still use the 1x6 for the sides, but go to a 1x12 (probably) for the tall sides and the base. This is for more stability and more shit.
- Alternatively: a small shelf at the top, since it's so tall. Thinking about trialing this, since I have wood left over. Only problem would be accessing that shelf when the saddle's on it, but wouldn't matter so much if I used it for those last-minute things, like boots and gloves.
- Sand it better, stain it better.
- Maybe slightly taller, and add a bridle hook? Runs the risk of being ginormous, but could be good for shows (that I don't attend.....).


.JPG)

19 comments
I love that idea!! So useful in certain situations.
ReplyDeletePlus there's so much space to get your art on.
Fun project! I have no idea how all our brushes/sprays/ointments/hoof picks multiply and make such a mess, but they do. Nice was to keep them contained and hold your saddle!
ReplyDeleteAnd what a great father-in-law! I love my tools. I am the son my father never had, so from probably way too young was using power tools of all types. One thing that can help the bad stain is to use a wood conditioner. Especially if you're building with less expensive woods like pine. It will help even out the stain job (you put it on first). And I'll enable you a bit here: you need to buy another tool, a sander! Just a little one, like a Corner Cat, is much fun and not expensive and so cute and useful.
Okay, totally getting the little Corner Cat this weekend. And more wood. :)
DeleteI love a woman with power tools. I've been wanting to buy (not make because HAHAHAHA) an unfinished brush box and paint it myself. I just haven't. Because lazy.
ReplyDeleteThat's why I'm your blog-wifey, right?
DeleteIf I ever get beyond embarrassed of my wood-working skills (poor hubs), I'll send you one!
Nice job!
ReplyDeleteI'm jealous - no miter saw in my collection (yet). Your fil is awesome. Best present I ever got from my ex was a super handy set of socket wrenches. The ex before him once "loaned" me a power saw to build a loft I designed for my apartment, but then wouldn't let me use it by myself. That is why he became an ex. ;D
Lucky you that you have not only the mitre saw, but the space to use it! I've been pining for a reciprocating saw myself, but haven't gotten that far. Sad when I realized I have more power tools than the boy does, and I actually know how to use them...
ReplyDeleteomg that would be so nice for showing
ReplyDeleteSuper cool! I think a bridle hook would enhance it. Double points for welding your own;)
ReplyDeleteVery cool idea. This would be great in a trailer or at shows.
ReplyDeleteExactly what I was going to say! Definitely a market for these babies.
DeleteSqueee so much awesome!
ReplyDeleteI am in suh admiration for your epic craftsmanship & hands-on skills!
1) this is awesome.
ReplyDelete2) I know Julia in person and she's also awesome. :)
Haha thanks Becky😜
DeleteDang girl, that is awesome!!
ReplyDeleteaaaannnnd now i want one too haha
ReplyDeletevery cool!! good job
ReplyDeleteTotal amazement of your skillz!!! Youre awesome with that saw! Cool project.
ReplyDeleteSo cool! I wish I was craft enough to build something like that.
ReplyDeleteThanks!